Friday, December 31, 2021

Pont Neuf

For the last week I've been working on Pont Neuf, a design by Emily Wessel of Tin Can Knits. This feminine sweater originally came out in the now defunct Twist Collective magazine, the same publication in which my designs Brookline, Vinland, and Sandridge appeared. The fact that I'm familiar with the pattern format and editing style makes knitting this so much easier. Of course, I'm having to make changes to fit Isabel's petite figure, but so far it's been pretty smooth sailing. I'm in the midst of a pause today while the body is blocking. Isabel will be moving away from Kingston later this week, and I need to be sure the sizing is on track before she departs. (Yes, my mother anxiety is at fever pitch with a move at the height of the Omicron wave.)

Here's a closeup of the gorgeous lace.

Now I must go and put together a tourtiere for tonight's New Year's Eve dinner. Stay well.

Monday, December 20, 2021

Just in Time

At the request of knitters, I have re-activated "Stripes". This is a favourite pre-Xmas knit, perfect for gift giving. You can read its 10-year-old origin story here and here. The Ravelry link is here.


 Please respect the copyright even though the pattern is free.

Friday, December 17, 2021

An Oldie But Goodie

This afternoon I re-activated my Diamanda Mitts pattern. Why now? Well, as of yesterday we are the Omicron capital of Canada, perhaps North America. Yes, this has happened even though we had so few cases and deaths in the first three waves that we were featured in a PBS Newshour segment.

This is the view from the lineup at the Olympic Harbour Marina (1976 Olympic sailing venue) where I stood and waited for my booster jab. You can see the crane for hoisting boats in and out of the water.

 And the boats themselves...

Being on international waters, there are rules (in normal times) for entering Canada.

After all of that I feel a need for small, bright, cheerful knitting projects today, so here is the link to the mitts.


I wrote this pattern way back in my early days of designing patterns. I still love this "pink lemonade" colourway. I don't think this Ella Rae Classic is around anymore. Certainly not in Canada.

Happy knitting.

Sunday, December 12, 2021

At Last, the Uniform Cardigan

Back in late spring/early summer I started Madder's Uniform Cardigan in Ultra Alpaca's "Blueberry Mix". Note: this publication is no longer in print, but there's a version on Ravelry here. There's a reason I don't often knit other designers' patterns. I'm rather petite and these projects always require so much futzing that it's usually simpler just to do my own thing. But I liked the elegant simplicity of the design and forged ahead. Slowly. So much plain knitting. So boring. So much ripping out and re-knitting to get everything in just the right proportions. I did some things my own way, including the top-down pocket method and the circularly knitted sleeves, among other details. For ages the cardigan languished with the knitting done but the weaving in, button sewing, and blocking left to do. I got so tired of it taunting me that I stuffed it into a trunk and pretty much forgot about it. Until last week. On Friday, finding myself in the mood, I finally wove in the ends and chose some buttons.

Can you see the purpley-pink heather pocket linings? Visit this tutorial to see how they were done. For links to other techniques I used that differ from the pattern see this post.

Last night we had horrific wind, the tail end of the system that caused the devastating tornadoes south of the border. The house actually shook and we lost power for most of the night. When it came back on, our furnace/boiler didn't. Eventually, feeling cold and exhausted I went on the internet and looked for a solution -- hitting a reset switch. I'm feeling clever for solving this, considering that boilers seem vaguely terrifying. This morning I went out and picked up bits of branches that had come down, then came back indoors and took this pic of me (with very windblown hair) in my new cardigan.

Ta da!

Sunday, December 5, 2021

Working Out the Kinks

When Isabel visited yesterday we browsed through a bunch of books and websites looking for inspiration for a new sweater for her (we found it). This morning I frogged about an hour of knitting on something that was making me grumpy every time I picked it up, and steamed the wool to get out the kinks. Here it is with the previously knitted part of the skein (still attached to the cake) waiting for my steam iron to do its magic.

All you need to do to un-kink is hover the iron over the wool, NEVER touching it or staying long enough in one place to scorch it. The wool is Kelbourne Woolens "Scout", a soft, gorgeous non-superwash dk wool. It might be my new go-to dk.

FYI, is it worth this extra un-kinking before re-knitting? Absolutely. One of the great things about aging is you actually have a lot of experience to lean on. Trust me on this.

Mostly, as I wait for snow and possibly freezing rain to arrive tonight, I've been working on a Merchant and Mills dress. This one, with this hack (the pleated skirt). It's not a quick sew, but this afternoon I've managed to complete most of the fully lined bodice. Feeling pleased with myself.

The main fabric is Brussels Washer, yarn dyed black, a blend of linen and rayon, and the lining is a remnant of some Essex linen/cotton left over from my Pants #1. 

And just in case you missed the slight modification I made to the sleeves on my new Wheatsheaves, here's a pic that shows the little garter stitch ridges at the top of the dropped sleeves.

Stay warm, stay safe, and keep on making!

Thursday, November 18, 2021

That Time

Time to haul out the woollies from the coat closet and sort out which ones need washing and repair. Yes, I should have done this in early summer, and bagged them away from moths, but somehow I didn't and here we are.

No moth damage, thank goodness, only a little wear on the elbows of my aqua Willingdon (my camera, as usual, is making this look grey). I did a quick and not very careful darning job (see below). It's on the underside of my arm and no one will notice that it's a little sloppy.


The leaves are sticking around strangely late this year.

Must get out and do some raking. If only the glow-in-the-dark ginko in the backyard would drop its leaves.

 Hmm, just as I wrote that, a huge wind blew up, so it looks as though I'm about to get my wish.

Tuesday, November 9, 2021

Almost There

Considering the paltry amount of time I'm spending on this new Wheatsheaves cardigan, it's amazing that I've got this far.

In truth, if I gave this thing the attention it deserves, I could be done this evening. But, life intervenes. Meals need cooking, family members need drives to the train station, and leaves need raking (sort of, because most of them STILL haven't fallen -- climate change?)

I'm also putting some effort into making a few more of these.

The pattern for my favourite 3-layer mask with a filter pocket is here. You can now buy flexible metal clips, meltblown polypropylene filters, and comfortable mask elastic through many online sewing companies. Much easier than 18 months ago when we were all improvising these bits and pieces. I machine wash my masks and handwash the filters in lukewarm dish soap and water. 

Had the kids over for mid-day dinner on the weekend. Beautiful sunny late fall day, perfect for lingering over tea at the end of the meal.

Turns out the the paint colour on our dining room walls, Farrow and Ball's "Setting Plaster", has suddenly become popular with the interior design crowd this season. For once we were ahead of the curve!

Friday, November 5, 2021

Wheatsheaves: Sleeve #1 Done!

I made a concerted effort to get the first sleeve done today. Here is the sweater resting in the late afternoon November sunshine. I love the way the angle of the sun at this time of the year floods our normally dark living room (because of the porch) with sun for a glorious hour late in the day.

You can see the garter ridges I added at the top of the sleeve. Very pleased with the effect, although I might not recommend it for someone with chunky upper arms as it tends to draw attention to that area. A few rounds from the end it became apparent that my ball of wool wasn't going to be sufficient to make it all the way to the bind off, so I decided to do a splice on a plain knitting round just before the last lace round.

Problem solved, except that just now I've discovered that my splicing tutorial needs to get added to the links in the sidebar of the blog.

In my last post I showed how to close the cardigan front using locking stitch markers. Sometimes those can cause a stitch or two to pull out a bit. Here's an even better solution for keeping a floppy cardigan together while knitting the sleeves. Simply thread a smaller size needle up through the fronts.


Works like a charm.

Tuesday, November 2, 2021

At It Again

I couldn't live with the cheap plastic, taped- together shutters on our kitchen windows anymore. It made no sense that the previous owners installed them there since they were forever in the way of the counter top underneath. So, off they came, courtesy of a Robertson screwdriver, and today I'm using wood filler and sandpaper preparatory to painting and installing curtains. I already have ones from a previous house and so the cost of this "improvement" is low.

Not much knitting action today.

Saturday, October 30, 2021

Wheatsheaves: Changing Things Up

It's a little embarrassing to admit this, but I often find knitting boring. I rarely knit for more than 30 minutes in a day (with exceptions when I'm near the end of a project and can feel momentum building OR when I have a particularly riveting audiobook). I have real difficulty re-knitting the same project over. Let's not revisit those times when I produced multiple Bibliogloves for this photo,


 or Penelope hats for this one.

It's clear that what I enjoy is the invention, the technical problem solving, and (I can't believe I'm writing this) the number crunching. Just plain re-knitting is sooo boring!

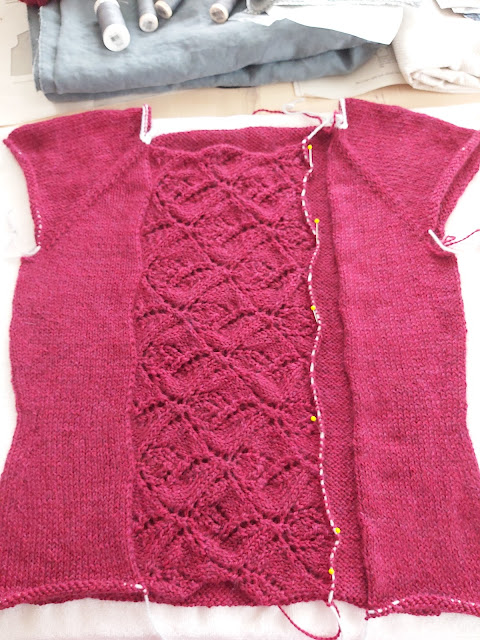
So, naturally, I can't just knit Wheatsheaves without any new little wrinkles, even small ones. Here's how I've changed things up.

1. When knitting up for the sleeves, I ignored the pattern advice to pick up in a ratio of 2 stitches for 3 rows. Instead, I knitted 5 stitches for 7 rows. This allowed me to arrive at a stitch count equal to the upper sleeve circumference in inches x 4 (the number of sts per inch). 

2. Instead of launching directly into the sleeve decreasing, I worked the first three rows as purl, knit, purl to echo the garter ridges in the lace borders. See? Hope this works out. If not, it can be re-done like the original.

3. In the above photo you can also see that I've chosen to knit the sleeves using the magic loop method. In fact, I've been knitting all my sleeves this way for the last five years. Good bye dpns. I'm using the same 32" circular for the sleeves that I used for the rest of the sweater. One needle to knit it all! 

To end this post, here are a couple of other points to keep in mind if you are following along with your own Wheatsheaves. 

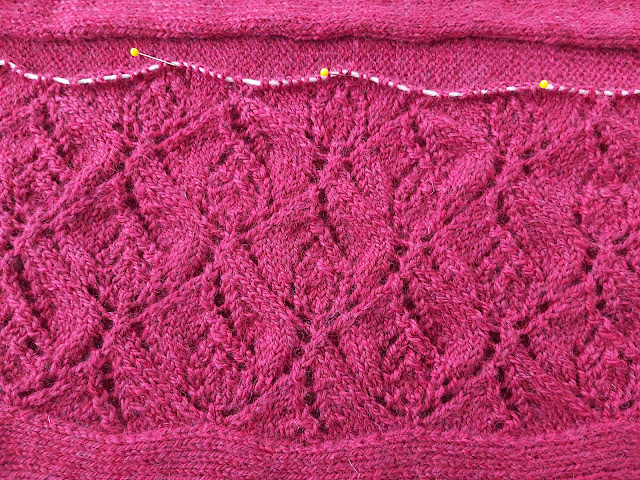
  • When knitting up stitches around the armhole, don't be upset if, at the top of the shoulder, your line of stitches deviates by half a stitch before getting back into a new groove for the trip down the other side of the sleeve. Here's what I mean.


The blue yarn marks the top of the shoulder. Notice how the line of knitted up stitches "jog" into a new vertical line at that point. That is unavoidable due to the fact that the front and back upper body sections were worked (seamlessly) in opposite directions. Whenever stocking stitch sections worked in two different directions are joined seamlessly, they will be off by half a stitch.

  • To make the knitting up of the sleeve less cumbersome, use some locking stitch markers to pin the fronts of the cardigan together so they won't flop around every time you flip the work. Once the first sleeve is done, you can stuff it into the interior of the sweater while you work the second sleeve for the same purpose.


Can't end this post without a view of the maple tree out front putting on its annual display. Not a sunny day, but even in the rain in a year when none of the foliage is at its best, it has a glorious inner glow.


Thursday, October 28, 2021

Wheatsheaves: Bind Off Dos and Don'ts

I strongly recommend knitting up neck and front borders before starting sleeves when knitting sweaters. You'll get a much better fit at the point when you can try on the sweater to judge sleeve length. While surplice-style borders seem straightforward, they are in fact rather tricky to design if you are intent on getting a good fit (apparently, a lot of sewing and knitwear designers lack this intent, at least from my experience). This border style requires some finessing around the neck and shoulders to avoid unsightly gaps. See this post

That said, I finished up the neck and front border on my new Wheatsheaves this morning. It took two attempts to get just the right degree of tension in the bind off. Here are some hints:

1. DON'T use a stretchy bind off such as Jeny's Surprisingly Stretchy Bind Off. The border edge will be ruffled instead of flat.

2. DON'T use a larger needle to bind off. The edge won't be ruffly, but it will still end up drooping over time.

3. DO use the same size needle as you used for the rest of the border.

4. DO consider using a dpn of the above size in your right hand when binding off, for ease of movement in working the edge.

5. DO make sure to work the last 2 stitches together as you finish to make a beautiful, tidy corner. This is a great trick to ending a lot of pieces with a sharp 90 degree corner. 

6. DO lay the work flat to see how the borders are lying, and,

7. DO make sure to try on the cardigan to test the tension around your neck. Take note of how the extra width in this cardigan shape means that the sleeves will join the body low on the arms. It's intentional. If you're worried about your yardage, you might feel better knowing that the sleeve lengths are proportionally shorter than normal because of this.

8. DO be prepared to pull out the bind off row and do it all again if you're not satisfied. You can wait if you like and see how the whole thing blocks. Just remember that if you decide to re-do it, you'll need to steam the unravelled wool to get out the kinks for a smooth second bind off attempt. Get it right. It's worth it!

Sunday, October 24, 2021

Wheatsheaves Borders: Easy to Adjust

The lower border is done. Here is the sweater laid out with the back on top. I lightly steamed the border so that I could try the cardigan on to check for length. It's perfect.

I've just wound the remaining skein into two big cakes, ready to complete the neck and front border. As the pattern indicates, it's best to do those before knitting the sleeves so that the garment will hang properly for trying on to check sleeve length. 

Note that the pattern is designed to allow you to alter the body length without fear that the stitch counts for the front borders will be messed up. There's a math formula with blank spaces to fill in to assist in calculating where to start in the lace pattern no matter how many stitches you need to knit up for the border, AND the knitting up is based on stitch to row ratios, not exact stitch numbers. To learn more about this approach, read this tutorial. You can apply this approach to any sweater, and it's so freeing!

P.S. Also, be sure to check out this link for particular instructions for picking up from a cable cast on (which was used at the back neck).

Friday, October 22, 2021

Parking Lot Inspiration

Nothing new to show as Wheatsheaves slowly progresses, so here are a few pics taken this afternoon with my lamentably bad phone camera when Isabel and I visited the nearby Lemoine Point Conservation Area for a late fall walk.


It was an afternoon of milkweed fluff blowing in the wind, hundreds (I kid you not) of chipmunks, water views, and woodland paths, but not much in the way of fall colour. This year, the leaves seem to be drying up and dropping without their usual spectacular show. Still, it was a lovely chilly day and a great opportunity to wear the Yule tam and Bibliogloves, along with other assorted woollies. 

On our return to the parking lot we ran into a woman wearing an astoundingly beautiful fair isle pullover. Of course I had to ask what the yarn and pattern were. The yarn? Good old Kroy Sock in denimy hues. Never seen it in a sweater before. The pattern? Her own. I'm inspired.

Hope to have the lower border on Wheatsheaves done for my next post. 


Tuesday, October 19, 2021

Soaking It Up

When October is sunny, it may be the best of months. Only 3C last night, but it's up to 17C this afternoon with a slightly brisk wind coming off the lake. Rhinebeck or KnitEast weather, if only this were a year for serious travel. My own travel today consisted of a bike ride around my neighbourhood, up and down the streets of historic Kingston, soaking up the last warmish weather with the fall leaves fluttering down on me. For the record, I wore this:

Grey and black checked linen York Pinafore (fabric from Blackbird Fabrics) Ellerbeck sweater, Pembroke Scarf, and my new Bibliogloves. More pics of the latter below.


Do you have any idea how difficult it is to take photos of your own hands? 

Wheatsheaves is back on the needles and the lace fun has begun!


Wednesday, October 13, 2021

While My Sweater is Shrinking...

Our house is cooling down now that we're in October, so my Wheatsheaves body is taking longer to dry than would have been the case a month ago. I am, however, pleased to report that the anticipated shrinkage appears to be underway. The sweater is only slightly damp now, and the body length is exactly where I hoped it would end up. No frogging or extra rows necessary. Occasionally, experience pays off.

While the afternoon sun works its magic on the sweater, I'm knitting up a quick little project.

It's a pair of Bibliogloves. The wool is Patons' Kroy Socks FX in "Midnight". I lost my last pair somewhere on my trip two years ago to KnitEast 2019 and have been putting off knitting a replacement. Still listening to "Murder at Queen's Landing", but also thinking about the now-distant pleasures of weekend wool retreats with knitting friends by the Bay of Fundy. Sigh.

P.S. Also thinking about ordering "State of Terror", the new book by Hilary Clinton and Louise Penny, and Chris Hadfield's new book, "The Apollo Murders". I'm a sucker for alternative histories.

Monday, October 11, 2021

Wheatsheaves: Blocking Work-in-Progress

Thanks to some audiobook listening (Andrea Penrose's "Wrexford and Sloane" mystery series), I'm almost ready to make the transition from the body (boring) to the lower lace border (exciting!). But ... I've worked with Eco+ so often that I know it will likely grow in length after blocking. I want the finished length of my cardigan to be 20". The instructions remind me to begin the border 3 1/2 inches before the desired finished length. That means I need to start the border when my sweater measures 16 1/2 inches from the top of the shoulder at the neck. REMINDER: because of the shoulder slope, make sure to measure just next to the neck and straight down. I actually stopped knitting when the body measured 16 1/4 inches, anticipating some growth. It's always better if you don't have to rip back and steam the crinkles out of the knitted yarn before proceeding. 

Here's the work soaking on my kitchen counter on a gloriously warm and sunny Thanksgiving afternoon. Is there a better time of year when the weather is nice?

The stitches are all on a length of waste yarn with the ball attached (but outside the tub so as to remain dry).

And here's the same chunk of knitting blocking on a towel. The width is 24" as set out in the schematic,


but the length is currently 17". I predict the length measurement will reduce to around 16 1/2 inches. Guess we'll know around this time tomorrow. Stay tuned.

Happy Thanksgiving for all you Canadian readers.

Tuesday, October 5, 2021

Wheatsheaves Upper Body Complete

This next step begins with transferring the provisionally cast-on shoulder stitches to a needle (I used a 24" 5.5 mm while I retained the back stitches on a 32" length). There's a link to my tutorial on doing this, and if you've never done it before, the tutorial has some useful info, especially regarding what to do with the last stitch. I also followed my own instructions to thread a short length of waste yarn through the cast-on stitches to make it easy to count the number of rows from the shoulder in order to make the fronts match the back. See?

The fronts go quickly and now I have everything joined up and the first two rows of the lower body all done.

It's clear sailing from here. I'm looking forward to the excitement of the front lace border!

Friday, October 1, 2021

Wheatsheaves Upper Back Done + My Giant Beanbag

Before lunch today I managed to squeeze in fifteen minutes of knitting and got this completed.

I needed something to hold down the curling edges so the general shape would show, and I chose some seasonally appropriate weights. After the setup row, I have 39 rows of stocking stitch in the outer shoulder. 

Yesterday I decided to finally take action on my need for a draught stopper (otherwise known as a door snake). This bedroom door was, at some point in its hundred-year-old history, cut a little short and the light/noise/draughts have been driving me crazy for the four years we've lived here.

Instructions: 1. Measure the exact width of the door opening. In my case, 30".

2. Cut a piece of sturdy fabric (I used Essex linen/cotton) 30 + 1" wide x 13" tall. 

3. Fold the fabric over and sew a tube using a small stitch and a 1/2" seam and leaving one end open.

4. Turn right side out and press. Also press the raw edges of the open end to the wrong side in a half inch hem.

5. Fill the bag with dried beans -- lots of them. The finished bag will be quite heavy!

6. Pin the opening closed and edge stitch it. I decided to do this instead of hand stitching the closure because I felt it would be so much stronger. Done!

P.S. You are right if you noticed that the door colour doesn't match the trim. This is the room I painted a couple of weeks ago and I deliberately left the door until a later date.

Wednesday, September 29, 2021

Fall Colours

I love burgundy for fall. Especially this version that has a slight grape undertone. The shade is rich, and over time will get that lovely faded look that linen gets with multiple washings. Here I am about to head out for my daily walk. Burgundy glasses, and I have a burgundy batik print mask in my pocket. No lipstick. The NYT had an article on lipstick wearing during pandemic times, and I lapped it up. I'm not a big, bold lips kind of girl -- my colouring and age don't lend themselves to it, but I love the way a bit of soft lipstick colour (maybe also used as blush) can give my aging face a lift. However, unlike the author of the article, I have no intention of wearing colourfast lipstick under my mask. Au naturel feels more comfortable to me just now. Guess it goes with the grey hair, ha, ha.

Now that this latest York Pinafore is done, I'm looking forward to this, which arrived this morning in the mail.


Now to my fabric stash to see if I have enough yardage in yarn-dyed black Brussels Washer. Maybe I'll need to design a sweater to go with it... Anticipation is as much fun as the making!